Search This Blog

Tuesday, January 24, 2012

Plot Step Functions : plot.stepfun()


plot.stepfun {stepfun}R Documentation

Plot Step Functions

Description

Method of the generic plot for stepfun objects and utility for plotting piecewise constant functions.

Usage

## S3 method for class 'stepfun':
plot(x, xval, xlim, ylim,
     xlab = "x", ylab = "f(x)", main = NULL,
     add = FALSE, verticals = TRUE, do.points = TRUE,
     pch = par("pch"), col.points=par("col"), cex.points=par("cex"),
     col.hor = par("col"), col.vert= par("col"),
     lty = par("lty"), lwd = par("lwd"), ...)

## S3 method for class 'stepfun':
lines(x, ...)

Arguments

x an R object inheriting from "stepfun".
xval numeric vector of abscissa values at which to evaluate x. Defaults to knots(x) restricted to xlim.
xlim,ylim numeric(2) each; range of x or y values to use. Both have sensible defaults.
xlab,ylab labels of x and y axis.
main main title.
add logical; if TRUE only add to an existing plot.
verticals logical; if TRUE, draw vertical lines at steps.
do.points logical; if true, also draw points at the (xlim restricted) knot locations.
pch character; point character if do.points.
col.points character or integer code; color of points if do.points.
cex.points numeric; character expansion factor if do.points.
col.hor color of horizontal lines.
col.vert color of vertical lines.
lty, lwd line type and thickness for all lines.
... further arguments of plot(.), or if(add) segments(.).

Value

A list with two components
t abscissa (x) values, including the two outermost ones.
y y values ‘in between’ the t[].

Author(s)

Martin Maechler maechler@stat.math.ethz.ch, 1990, 1993; ported to R, 1997.

See Also

ecdf for empirical distribution functions as special step functions, approxfun and splinefun.

Examples

y0 <- c(1,2,4,3)
sfun0  <- stepfun(1:3, y0, f = 0)
sfun.2 <- stepfun(1:3, y0, f = .2)
sfun1  <- stepfun(1:3, y0, right = TRUE)

tt <- seq(0,3, by=0.1)
op <- par(mfrow=c(2,2))
plot(sfun0); plot(sfun0, xval=tt, add=TRUE, col.h="bisque")
plot(sfun.2);plot(sfun.2,xval=tt, add=TRUE, col.h="orange")
plot(sfun1);lines(sfun1, xval=tt, col.h="coral")
##-- This is  revealing :
plot(sfun0, verticals= FALSE,
     main = "stepfun(x, y0, f=f)  for f = 0, .2, 1")
for(i in 1:3)
  lines(list(sfun0,sfun.2,stepfun(1:3,y0,f = 1))[[i]], col.h=i, col.v=i)
legend(2.5, 1.9, paste("f =", c(0,0.2,1)), col=1:3, lty=1, y.inter=1); par(op)

# Extend and/or restrict 'viewport':
plot(sfun0, xlim = c(0,5), ylim = c(0, 3.5),
     main = "plot(stepfun(*), xlim= . , ylim = .)")

##-- this works too (automatic call to  ecdf(.)):
plot.stepfun(rt(50, df=3), col.vert = "gray20")

Empirical Cumulative Distribution Function


ecdf {stepfun}R Documentation

Empirical Cumulative Distribution Function

Description

Compute or plot an empirical cumulative distribution function.

Usage

ecdf(x)

## S3 method for class 'ecdf':
plot(x, ..., ylab="Fn(x)", verticals = FALSE,
     col.01line = "gray70")

## S3 method for class 'ecdf':
print(x, digits= getOption("digits") - 2, ...)

Arguments

x numeric vector of “observations” in ecdf; for the methods, an object of class "ecdf", typically.
... arguments to be passed to subsequent methods, i.e., plot.stepfun for the plot method.
ylab label for the y-axis.
verticals see plot.stepfun.
col.01line numeric or character specifying the color of the horizontal lines at y=0 and 1, see colors.
digits number of significant digits to use, see print.

Details

The e.c.d.f. (empirical cumulative distribution function) Fn is a step function with jump 1/n at each observation (possibly with multiple jumps at one place if there are ties).
For observations x= (x1,x2, ... xn), Fn is the fraction of observations less or equal to t, i.e.,
Fn(t) = #{x_i <= t} / n = 1/n sum(i=1,n) Indicator(xi <= t).
The function plot.ecdf which implements the plot method for ecdf objects, is implemented via a call to plot.stepfun; see its documentation.

Value

For ecdf, a function of class "ecdf", inheriting from the "stepfun" class.

Author(s)

Martin Maechler, maechler@stat.math.ethz.ch.

See Also

stepfun, the more general class of step functions, approxfun and splinefun.

Examples

##-- Simple didactical  ecdf  example:
Fn <- ecdf(rnorm(12))
Fn; summary(Fn)
12*Fn(knots(Fn)) == 1:12 ## == 1:12  if and only if there are no ties !

y <- round(rnorm(12),1); y[3] <- y[1]
Fn12 <- ecdf(y)
Fn12
print(knots(Fn12), dig=2)
12*Fn12(knots(Fn12)) ## ~= 1:12  if there where no ties

summary(Fn12)
summary.stepfun(Fn12)
print(ls.Fn12 <- ls(env= environment(Fn12)))
##[1] "f"  "method"  "n"  "ties"   "x"  "y"  "yleft"  "yright"

12 * Fn12((-20:20)/10)

###----------------- Plotting --------------------------

op <- par(mfrow=c(3,1), mgp=c(1.5, 0.8,0), mar= .1+c(3,3,2,1))

F10 <- ecdf(rnorm(10))
summary(F10)

plot(F10)
plot(F10, verticals= TRUE, do.p = FALSE)

plot(Fn12)# , lwd=2) dis-regarded
xx <- unique(sort(c(seq(-3,2, length=201), knots(Fn12))))
lines(xx, Fn12(xx), col='blue')
abline(v=knots(Fn12),lty=2,col='gray70')

plot(xx, Fn12(xx), type='b', cex=.1)#- plot.default
plot(Fn12, col.h='red', add= TRUE)  #- plot method
abline(v=knots(Fn12),lty=2,col='gray70')
plot(Fn12, verticals=TRUE, col.p='blue', col.h='red',col.v='bisque')
par(op)

##-- this works too (automatic call to  ecdf(.)):
plot.ecdf(rnorm(24))

Add Lines or Points to a Survival Plot


lines.survfit {survival}R Documentation

Add Lines or Points to a Survival Plot

Description

Often used to add the expected survival curve(s) to a Kaplan-Meier plot generated with plot.survfit.

Usage

## S3 method for class 'survfit':
lines(x, type="s", mark=3, col=1, lty=1,
lwd=1, mark.time=TRUE , xscale=1,  firstx=0, firsty=1, xmax, fun, conf.int=FALSE,  ...)
## S3 method for class 'survfit':
points(x, ...)

Arguments

x a survival object, generated from the survfit or survexp functions.
type the line type, as described in lines. The default is a step function for survfit objects, and a connected line for survexp objects.
mark vectors giving the mark symbol, color, line type and line width for the added curves.
mark.time controls the labeling of the curves. If FALSE, no labeling is done. If TRUE, then curves are marked at each censoring time. If mark.time is a numeric vector, then curves are marked at the specified time points.
xscale a number used to divide the x values. If time was originally in days, a value of 365.24 would give a plotted scale in years.
firstx,firsty the starting point for the survival curves. If either of these is set to NA or the plot will start at the first time point of the curve.
col,lty,lwd,... passed to lines
xmax the maximum horizontal plot coordinate. This shortens the curve before plotting it, so unlike using the xlim graphical parameter, warning messages about out of bounds points are not generated.
fun an arbitrary function defining a transformation of the survival curve. For example fun=log is an alternative way to draw a log-survival curve (but with the axis labeled with log(S) values). Four often used transformations can be specified with a character argument instead: "log" is the same as using the log=T option, "event" plots cumulative events (f(y) =1-y), "cumhaz" plots the cumulative hazard function (f(y) = -log(y)) and "cloglog" creates a complementary log-log survival plot (f(y) = log(-log(y)) along with log scale for the x-axis).
conf.int if TRUE, confidence bands for the curves are also plotted. If set to "only", then only the CI bands are plotted, and the curve itself is left off. This can be useful for fine control over the colors or line types of a plot.

Value

a list with components x and y, containing the coordinates of the last point on each of the curves (but not of the confidence limits). This may be useful for labeling.

Side Effects

one or more curves are added to the current plot.

See Also

lines, par, plot.survfit, survfit, survexp.

Examples

fit <- survfit(Surv(time, status) ~ sex, pbc,subset=1:312)
plot(fit, mark.time=FALSE, xscale=365.24,
        xlab='Years', ylab='Survival')
lines(fit[1], lwd=2, xscale=365.24)    #darken the first curve and add marks

# add expected survival curves for the two groups,
#   based on the US census data
tdata <- data.frame(age=pbc$age*365.24, sex=pbc$sex +1,
                    year= rep(mdy.date(1,1,1976), nrow(pbc)))
tdata<-tdata[1:312,] ## only the randomised people, with no missing data

efit <- survexp(~ sex+ratetable(sex=sex,age=age,year=year), data=tdata, ratetable=survexp.us, times=(0:24)*182)
temp <- lines(efit, lty=2, xscale=365.24, lwd=2:1)
text(temp, c("Male", "Female"), adj= -.1) #labels just past the ends
title(main="Primary Biliary Cirrhosis, Observed and Expected")

[Package survival version 2.32 Index]

Plot empirical and fitted survival curves

Plot empirical and fitted survival curves

Description

Plot a Kaplan-Meier estimate of the survival probability and compare it with the fitted survival probability from a msm model.

Usage

plot.survfit.msm(x, from=1, to=NULL, range=NULL, covariates="mean",
                 interp=c("start","midpoint"), ci=c("none","normal","bootstrap"), B=100,
                 legend.pos=NULL, xlab="Time", ylab="Survival probability", lwd=1, ...)

Arguments

x Output from msm, representing a fitted multi-state model object.
from State from which to consider survival. Defaults to state 1.
to Absorbing state to consider. Defaults to the highest-labelled absorbing state.
range Vector of two elements, giving the range of times to plot for.
covariates Covariate values for which to evaluate the expected probabilities. This can either be:

the string "mean", denoting the means of the covariates in the data (this is the default),

the number 0, indicating that all the covariates should be set to zero,

or a list of values, with optional names. For example
list (60, 1)
where the order of the list follows the order of the covariates originally given in the model formula, or a named list,
list (age = 60, sex = 1)
ci If "none" (the default) no confidence intervals are plotted. If "normal" or "bootstrap", confidence intervals are plotted based on the respective method in pmatrix.msm. This is very computationally-intensive, since intervals must be computed at a series of times.
B Number of bootstrap or normal replicates for the confidence interval. The default is 100 rather than the usual 1000, since these plots are for rough diagnostic purposes.
interp If interp="start" (the default) then the entry time into the absorbing state is assumed to be the time it is first observed in the data.
If interp="midpoint" then the entry time into the absorbing state is assumed to be halfway between the time it is first observed and the previous observation time. This is generally more reasonable for "progressive" models with observations at arbitrary times.
legend.pos Vector of the x and y position, respectively, of the legend.
xlab x axis label.
ylab y axis label.
lwd Line width. See par.
... Other arguments to be passed to the plot.survfit and lines.survfit functions.

Details

If the data represent observations of the process at arbitrary times, then the first occurrence of the absorbing state in the data will usually be greater than the actual first transition time to that state. Therefore the Kaplan-Meier estimate of the survival probability will be an overestimate.
This currently only handles time-homogeneous models.

See Also

survfit, plot.survfit, plot.prevalence.msm

Plot Step Functions

Plot Step Functions

Description

Method of the generic plot for stepfun objects and utility for plotting piecewise constant functions.

Usage

## S3 method for class 'stepfun':
plot(x, xval, xlim, ylim,
     xlab = "x", ylab = "f(x)", main = NULL,
     add = FALSE, verticals = TRUE, do.points = TRUE,
     pch = par("pch"), col.points=par("col"), cex.points=par("cex"),
     col.hor = par("col"), col.vert= par("col"),
     lty = par("lty"), lwd = par("lwd"), ...)

## S3 method for class 'stepfun':
lines(x, ...)

Arguments

x an R object inheriting from "stepfun".
xval numeric vector of abscissa values at which to evaluate x. Defaults to knots(x) restricted to xlim.
xlim,ylim numeric(2) each; range of x or y values to use. Both have sensible defaults.
xlab,ylab labels of x and y axis.
main main title.
add logical; if TRUE only add to an existing plot.
verticals logical; if TRUE, draw vertical lines at steps.
do.points logical; if true, also draw points at the (xlim restricted) knot locations.
pch character; point character if do.points.
col.points character or integer code; color of points if do.points.
cex.points numeric; character expansion factor if do.points.
col.hor color of horizontal lines.
col.vert color of vertical lines.
lty, lwd line type and thickness for all lines.
... further arguments of plot(.), or if(add) segments(.).

Value

A list with two components
t abscissa (x) values, including the two outermost ones.
y y values ‘in between’ the t[].

Author(s)

Martin Maechler maechler@stat.math.ethz.ch, 1990, 1993; ported to R, 1997.

See Also

ecdf for empirical distribution functions as special step functions, approxfun and splinefun.

Examples

y0 <- c(1,2,4,3)
sfun0  <- stepfun(1:3, y0, f = 0)
sfun.2 <- stepfun(1:3, y0, f = .2)
sfun1  <- stepfun(1:3, y0, right = TRUE)

tt <- seq(0,3, by=0.1)
op <- par(mfrow=c(2,2))
plot(sfun0); plot(sfun0, xval=tt, add=TRUE, col.h="bisque")
plot(sfun.2);plot(sfun.2,xval=tt, add=TRUE, col.h="orange")
plot(sfun1);lines(sfun1, xval=tt, col.h="coral")
##-- This is  revealing :
plot(sfun0, verticals= FALSE,
     main = "stepfun(x, y0, f=f)  for f = 0, .2, 1")
for(i in 1:3)
  lines(list(sfun0,sfun.2,stepfun(1:3,y0,f = 1))[[i]], col.h=i, col.v=i)
legend(2.5, 1.9, paste("f =", c(0,0.2,1)), col=1:3, lty=1, y.inter=1); par(op)

# Extend and/or restrict 'viewport':
plot(sfun0, xlim = c(0,5), ylim = c(0, 3.5),
     main = "plot(stepfun(*), xlim= . , ylim = .)")

##-- this works too (automatic call to  ecdf(.)):
plot.stepfun(rt(50, df=3), col.vert = "gray20")

Monday, January 23, 2012

Title, legends, text in R

Axes and Text

Many high level plotting functions (plot, hist, boxplot, etc.) allow you to include axis and text options (as well as other graphical paramters). For example
# Specify axis options within plot()
plot(x, y, main="title", sub="subtitle",
  xlab="X-axis label", ylab="y-axix label",
  xlim=c(xmin, xmax), ylim=c(ymin, ymax))

For finer control or for modularization, you can use the functions described below.

Titles

Use the title( ) function to add labels to a plot.
title(main="main title", sub="sub-title",
   xlab="x-axis label", ylab="y-axis label")

Many other graphical parameters (such as text size, font, rotation, and color) can also be specified in the title( ) function.
# Add a red title and a blue subtitle. Make x and y
# labels 25% smaller than the default and green.
title(main="My Title", col.main="red",
  sub="My Sub-title", col.sub="blue",
  xlab="My X label", ylab="My Y label",
  col.lab="green", cex.lab=0.75)

Text Annotations

Text can be added to graphs using the text( ) and mtext( ) functions. text( ) places text within the graph while mtext( ) places text in one of the four margins.
text(location, "text to place", pos, ...)
mtext("text to place", side, line=n, ...)

Common options are described below.
option description
location location can be an x,y coordinate. Alternatively, the text can be placed interactively via mouse by specifying location as locator(1).
pos position relative to location. 1=below, 2=left, 3=above, 4=right. If you specify pos, you can specify offset= in percent of character width.
side which margin to place text. 1=bottom, 2=left, 3=top, 4=right. you can specify line= to indicate the line in the margin starting with 0 and moving out. you can also specify adj=0 for left/bottom alignment or adj=1 for top/right alignment.
Other common options are cex, col, and font (for size, color, and font style respectively).

Labeling points

You can use the text( ) function (see above) for labeling point as well as for adding other text annotations. Specify location as a set of x, y coordinates and specify the text to place as a vector of labels. The x, y, and label vectors should all be the same length.
# Example of labeling points
attach(mtcars)
plot(wt, mpg, main="Milage vs. Car Weight",
   xlab="Weight", ylab="Mileage", pch=18, col="blue")
text(wt, mpg, row.names(mtcars), cex=0.6, pos=4, col="red")

labeling points click to view

Math Annotations

You can add mathematically formulas to a graph using TEX-like rules. See help(plotmath) for details and examples.

Axes

You can create custom axes using the axis( ) function.
axis(side, at=, labels=, pos=, lty=, col=, las=, tck=, ...)
where
option description
side an integer indicating the side of the graph to draw the axis (1=bottom, 2=left, 3=top, 4=right)
at a numeric vector indicating where tic marks should be drawn
labels a character vector of labels to be placed at the tickmarks
(if NULL, the at values will be used)
pos the coordinate at which the axis line is to be drawn.
(i.e., the value on the other axis where it crosses)
lty line type
col the line and tick mark color
las labels are parallel (=0) or perpendicular(=2) to axis
tck length of tick mark as fraction of plotting region (negative number is outside graph, positive number is inside, 0 suppresses ticks, 1 creates gridlines) default is -0.01
(...) other graphical parameters
If you are going to create a custom axis, you should suppress the axis automatically generated by your high level plotting function. The option axes=FALSE suppresses both x and y axes. xaxt="n" and yaxt="n" suppress the x and y axis respectively. Here is a (somewhat overblown) example.
# A Silly Axis Example

# specify the data
x <- c(1:10); y <- x; z <- 10/x

# create extra margin room on the right for an axis
par(mar=c(5, 4, 4, 8) + 0.1)

# plot x vs. y
plot(x, y,type="b", pch=21, col="red",
   yaxt="n", lty=3, xlab="", ylab="")

# add x vs. 1/x
lines(x, z, type="b", pch=22, col="blue", lty=2)

# draw an axis on the left
axis(2, at=x,labels=x, col.axis="red", las=2)

# draw an axis on the right, with smaller text and ticks
axis(4, at=z,labels=round(z,digits=2),
  col.axis="blue", las=2, cex.axis=0.7, tck=-.01)

# add a title for the right axis
mtext("y=1/x", side=4, line=3, cex.lab=1,las=2, col="blue")

# add a main title and bottom and left axis labels
title("An Example of Creative Axes", xlab="X values",
   ylab="Y=X")

axis example click to view

Minor Tick Marks

The minor.tick( ) function in the Hmisc package adds minor tick marks.
# Add minor tick marks
library(Hmisc)
minor.tick(nx=n, ny=n, tick.ratio=n)

nx is the number of minor tick marks to place between x-axis major tick marks.
ny does the same for the y-axis. tick.ratio is the size of the minor tick mark relative to the major tick mark. The length of the major tick mark is retrieved from par("tck").

Reference Lines

Add reference lines to a graph using the abline( ) function.
abline(h=yvalues, v=xvalues)
Other graphical parameters (such as line type, color, and width) can also be specified in the abline( ) function.
# add solid horizontal lines at y=1,5,7
abline(h=c(1,5,7))
# add dashed blue verical lines at x = 1,3,5,7,9
abline(v=seq(1,10,2),lty=2,col="blue")

Note: You can also use the grid( ) function to add reference lines.

Legend

Add a legend with the legend() function.
legend(location, title, legend, ...)
Common options are described below.
option description
location There are several ways to indicate the location of the legend. You can give an x,y coordinate for the upper left hand corner of the legend. You can use locator(1), in which case you use the mouse to indicate the location of the legend. You can also use the keywords "bottom", "bottomleft", "left", "topleft", "top", "topright", "right", "bottomright", or "center". If you use a keyword, you may want to use inset= to specify an amount to move the legend into the graph (as fraction of plot region).
title A character string for the legend title (optional)
legend A character vector with the labels
... Other options. If the legend labels colored lines, specify col= and a vector of colors. If the legend labels point symbols, specify pch= and a vector of point symbols. If the legend labels line width or line style, use lwd= or lty= and a vector of widths or styles. To create colored boxes for the legend (common in bar, box, or pie charts), use fill= and a vector of colors.
Other common legend options include bty for box type, bg for background color, cex for size, and text.col for text color. Setting horiz=TRUE sets the legend horizontally rather than vertically.
# Legend Example
attach(mtcars)
boxplot(mpg~cyl, main="Milage by Car Weight",
   yaxt="n", xlab="Milage", horizontal=TRUE,
   col=terrain.colors(3))
legend("topright", inset=.05, title="Number of Cylinders",
   c("4","6","8"), fill=terrain.colors(3), horiz=TRUE)

Legend example click to view
For more on legends, see help(legend). The examples in the help are particularly informative.

Laplace Distribution

Laplace Distribution

Description

These functions provide information about the Laplace distribution with location parameter equal to m and dispersion equal to s: density, cumulative distribution, quantiles, log hazard, and random generation.
The Laplace distribution has density
f(y) = exp(-abs(y-m)/s)/(2*s)
where m is the location parameter of the distribution and s is the dispersion.

Usage

dlaplace(y, m=0, s=1, log=FALSE)
plaplace(q, m=0, s=1)
qlaplace(p, m=0, s=1)
hlaplace(y, m=0, s=1)
rlaplace(n, m=0, s=1)

Arguments

y vector of responses.
q vector of quantiles.
p vector of probabilities
n number of values to generate
m vector of location parameters.
s vector of dispersion parameters.
log if TRUE, log probabilities are supplied.

Author(s)

J.K. Lindsey

See Also

dexp for the exponential distribution and dcauchy for the Cauchy distribution.

Examples

dlaplace(5, 2, 1)
plaplace(5, 2, 1)
qlaplace(0.95, 2, 1)
rlaplace(10, 2, 1)

PROBILITY DISTRIBUTIONS, QUANTILES, CHECKS FOR NORMALITY

PROBILITY DISTRIBUTIONS, QUANTILES, CHECKS FOR NORMALITY

Probability Distributions
R has density and distribution functions built-in for about 20 probability distributions, including those in the following table:
distributionfunctiontype
binomialbinomdiscrete
chi-squaredchisqcontinuous
Ffcontinuous
hypergeometrichyperdiscrete
normalnormcontinuous
Poissonpoisdiscrete
Student's ttcontinuous
uniformunifcontinuous
By prefixing a "d" to the function name in the table above, you can get probability density values (pdf). By prefixing a "p", you can get cumulative probabilities (cdf). By prefixing a "q", you can get quantile values. By prefixing an "r", you can get random numbers from the distribution. I will demonstrate using the normal distribution.
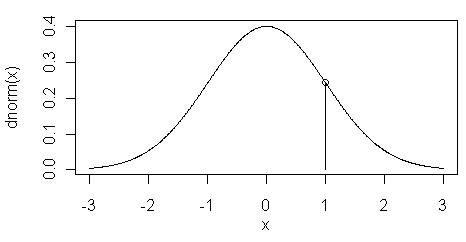
PDF The dnorm( ) function returns the height of the normal curve at some value along the x-axis. This is illustrated in the figure at left. Here the value of dnorm(1) is shown by the vertical line at x=1...

> dnorm(1)
[1] 0.2419707
With no options specified, the value of "x" is treated as a standard score or z-score. To change this, you can specify "mean=" and "sd=" options. In other words, dnorm( ) returns the probability density function or pdf.
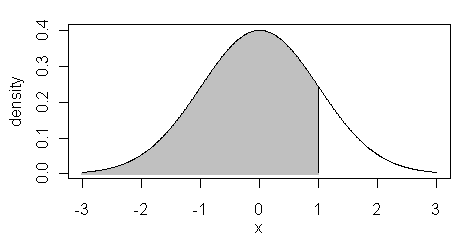
CDF The pnorm( ) function is the cumulative density function or cdf. It returns the area below the given value of "x", or for x=1, the shaded region in the figure at right...

> pnorm(1)
[1] 0.8413447
Once again, the defaults for mean and sd are 0 and 1 respectively. These can be set to other values as in the case of dnorm( ). To find the area above the cutoff x-value, either subtract from 1, or set the "lower.tail=" option to FALSE...
> 1 - pnorm(1)
[1] 0.1586553
> pnorm(1, lower.tail=F)
[1] 0.1586553

So, good news! No more tables! To get quantiles or "critical values", you can use the qnorm( ) function as in the following examples...

> qnorm(.95)                           # p = .05, one-tailed (upper)
[1] 1.644854
> qnorm(c(.025,.975))                  # p = .05, two-tailed
[1] -1.959964  1.959964
> qnorm(seq(.1,.9,.1))                 # deciles from the unit normal dist.
[1] -1.2815516 -0.8416212 -0.5244005 -0.2533471  0.0000000  0.2533471  0.5244005
[8]  0.8416212  1.2815516
Once again, there are "mean=" and "sd=" options. To use these functions with other distributions, more parameters may need to be given. Here are some examples...

> pt(2.101, df=8)                      # area below t = 2.101, df = 8
[1] 0.9655848
> qchisq(.95, df=1)                    # critical value of chi square, df = 1
[1] 3.841459
> qf(c(.025,.975), df1=3, df2=12)
[1] 0.06975178 4.47418481
> dbinom(60, size=100, prob=.5)        # a discrete binomial probability
[1] 0.01084387
The help pages for these functions will give the necessary details. Random numbers are generated from a given distribution like this...

> runif(9)                             # 9 uniformly distributed random nos.
[1] 0.01961714 0.62086249 0.64193142 0.99583719 0.06294405 0.94324289 0.88233387
[8] 0.11851026 0.60300929
> rnorm(9)                             # 9 normally distributed random nos.
[1] -0.95186711  0.09650050 -0.37148202  0.56453509 -0.44124876 -0.43263580
[7] -0.46909466  1.38590806 -0.06632486
> rt(9, df=10)                         # 9 t-distributed random nos.
[1] -1.538466123 -0.249067184 -0.324245905 -0.009964799  0.143282490
[6]  0.619253016  0.247399305  0.691629869 -0.177196453
One again, I refer you to the help pages for all the gory details.
Empirical Quantiles
Suppose you want quartiles or deciles or percentiles or whatever from a sample or empirical distribution. The appropriate function is quantile( ). From the help page for this function, the syntax is...

quantile(x, probs = seq(0, 1, 0.25), na.rm = FALSE,
         names = TRUE, type = 7, ...)
This says "enter a vector, x, of data values, or the name of such a vector, and I will return quantiles for positions 0, .25, .5, .75, and 1 (in other words, quartiles along with the min and max values), without removing missing values (and if missing values exist the function will fail and return an error message), I'll give each of the returned values a name, and I will use method 7 (of 9) to do the calculations." Let's see this happen using the built-in data set "rivers"...
> quantile(rivers)
  0%  25%  50%  75% 100% 
 135  310  425  680 3710
Compare this to what you get with a summary...
> summary(rivers)
   Min. 1st Qu.  Median    Mean 3rd Qu.    Max. 
  135.0   310.0   425.0   591.2   680.0  3710.0
So what's the point? The quantile( ) function is much more versatile because you can change the default "probs=" values...
> quantile(rivers, probs=seq(.2,.8,.2))     # quintiles
20% 40% 60% 80% 
291 375 505 735 
> quantile(rivers, probs=seq(.1,.9,.1))     # deciles
 10%  20%  30%  40%  50%  60%  70%  80%  90% 
 255  291  330  375  425  505  610  735 1054 
> quantile(rivers, probs=.55)               # 55th percentile
55% 
460
> quantile(rivers, probs=c(.05,.95))        # and so on
  5%  95% 
 230 1450
And then there is the "type=" option. It turns out there is some disagreement among different sources as to just how quantiles should be calculated from an empirical distribution. R doesn't take sides. It gives you nine different methods! Pick the one you like best by setting the "type=" option to a number between 1 and 9. Here are some details (and more are available on the help page): type=2 will give the results most people are taught to calculate in an intro stats course, type=3 is the SAS definition, type=6 is the Minitab and SPSS definition, type=7 is the default and the S definition and seems to work well when the variable is continuous.
Checks For Normality
Parametric procedures like the t-test, F-test (ANOVA), and Pearson r assume the data are distributed normally. There are several ways to check this assumption.
qqnorm The qqnorm( ) function allows a graphical evaluation...

> qqnorm(rivers)
If the values in the vector are normally distributed, the points on the plot will fall (more or less) along a straight line. This line can be plotted on the graph like this...
> qqline(rivers)
As you can see, the "rivers" vector is strongly skewed, as indicated by the bowing of the points up away from the expected straight line. The very long upper tail (strong positive skew) in this distribution could also have been visualized using...
> plot(density(rivers))
...the output of which is not shown here. You can see this in the QQ plot as well by the fact that the higher sample values are much too large to be from a theoretical normal distribution. The lower tail of the distribution appears to be a bit short.
Statistical tests for normality are also available. Perhaps the best known of these is the Shapiro-Wilk test...

> shapiro.test(rivers)

        Shapiro-Wilk normality test

data:  rivers 
W = 0.6666, p-value < 2.2e-16
I believe we can safely reject the null hypothesis of normality here! Here's a question for all you stat students out there: how often should the following result in a rejection of the null hypothesis if our random number generator is worth its salt?
> shapiro.test(rnorm(100))

        Shapiro-Wilk normality test

data:  rnorm(100) 
W = 0.9894, p-value = 0.6192
This question will be on the exam! Another test that can be used here is the Kolmogorov-Smirnov test...

> ks.test(rivers, "pnorm", alternative="two.sided")

        One-sample Kolmogorov-Smirnov test

data:  rivers 
D = 1, p-value < 2.2e-16
alternative hypothesis: two-sided 

Warning message:
In ks.test(rivers, "pnorm", alternative = "two.sided") :
  cannot compute correct p-values with ties
But it gets upset when there are ties in the data. Inside the function, the value "pnorm" tells the test to compare the empirical cumulative density function of "rivers" to the cumulative density function of a normal distribution. The null hypothesis says the two will match. Clearly they do not, so the null hypothesis is rejected. We conclude once again, and for the last time in this tutorial, that "rivers" is not normally distributed.

Quantile-Quantile Plots

Quantile-Quantile Plots

Description

qqnorm is a generic function the default method of which produces a normal QQ plot of the values in y. qqline adds a line to a normal quantile-quantile plot which passes through the first and third quartiles.
qqplot produces a QQ plot of two datasets.
Graphical parameters may be given as arguments to qqnorm, qqplot and qqline.

Usage

qqnorm(y, ...)
## Default S3 method:
qqnorm(y, ylim, main = "Normal Q-Q Plot",
       xlab = "Theoretical Quantiles",
       ylab = "Sample Quantiles", plot.it = TRUE, datax = FALSE,
       ...)
qqline(y, datax = FALSE, ...)
qqplot(x, y, plot.it = TRUE, xlab = deparse(substitute(x)),
       ylab = deparse(substitute(y)), ...)

Arguments

x The first sample for qqplot.
y The second or only data sample.
xlab, ylab, main plot labels.
plot.it logical. Should the result be plotted?
datax logical. Should data values be on the x-axis?
ylim, ... graphical parameters.

Value

For qqnorm and qqplot, a list with components
x The x coordinates of the points that were/would be plotted
y The original y vector, i.e., the corresponding y coordinates including NAs.

References

Becker, R. A., Chambers, J. M. and Wilks, A. R. (1988) The New S Language. Wadsworth & Brooks/Cole.

See Also

ppoints.

Examples

y <- rt(200, df = 5)
qqnorm(y); qqline(y, col = 2)
qqplot(y, rt(300, df = 5))

qqnorm(precip, ylab = "Precipitation [in/yr] for 70 US cities")

Sunday, January 22, 2012

The Laplace Distribution


laplaceUC {VGAM}R Documentation

The Laplace Distribution

Description

Density, distribution function, quantile function and random generation for the Laplace distribution with location parameter location and scale parameter scale.

Usage

dlaplace(x, location=0, scale=1)
plaplace(q, location=0, scale=1)
qlaplace(p, location=0, scale=1)
rlaplace(n, location=0, scale=1)

Arguments

x, q vector of quantiles.
p vector of probabilities.
n number of observations. Positive integer of length 1.
location the location parameter a, which is the mean.
scale the scale parameter b. Must consist of positive values.

Details

The Laplace distribution is often known as the double-exponential distribution and, for modelling, has heavier tail than the normal distribution. The Laplace density function is
f(y) = (1/(2b)) exp( -|y-a|/b )
where -Inf, -Inf and b>0. The mean is a and the variance is 2b^2.
See laplace, the VGAM family function for estimating the two parameters by maximum likelihood estimation, for formulae and details. Apart from n, all the above arguments may be vectors and are recyled to the appropriate length if necessary.

Value

dlaplace gives the density, plaplace gives the distribution function, qlaplace gives the quantile function, and rlaplace generates random deviates.

Author(s)

T. W. Yee

References

Evans, M., Hastings, N. and Peacock, B. (2000) Statistical Distributions, New York: Wiley-Interscience, Third edition.

See Also

laplace.

Examples

loc = 1; b = 2
y = rlaplace(n=100, loc=loc, scale=b)
mean(y)
loc      # population mean
var(y)
2 * b^2  # population variance

## Not run: 
x = seq(-5, 5, by=0.01)
loc = 0; b = 1.5
plot(x, dlaplace(x, loc, b), type="l", col="blue", ylim=c(0,1),
     main="Blue is density, red is cumulative distribution function",
     sub="Purple are 5,10,...,95 percentiles", las=1, ylab="")
abline(h=0, col="blue", lty=2)
lines(qlaplace(seq(0.05,0.95,by=0.05), loc, b),
      dlaplace(qlaplace(seq(0.05,0.95,by=0.05), loc, b), loc, b),
      col="purple", lty=3, type="h")
lines(x, plaplace(x, loc, b), type="l", col="red")
abline(h=0, lty=2)
## End(Not run)

plaplace(qlaplace(seq(0.05,0.95,by=0.05), loc, b), loc, b)

[Package VGAM version 0.7-4 Index]

Thursday, January 12, 2012

Linux Socket Programming In C++


LINUX GAZETTE

"Linux Gazette...making Linux just a little more fun!"


Linux Socket Programming In C++

By Rob Tougher


Contents

1. Introduction
2. Overview of Client-Server Communications
3. Implementing a Simple Server and Client
3.1 Server - establishing a listening socket
3.2 Client - connecting to the server
3.3 Server - Accepting the client's connection attempt
3.4 Client and Server - sending and receiving data
4 Compiling and Testing Our Client and Server
4.1 File list
4.2 Compile and test
5. Conclusion

1. Introduction

Sockets are a mechanism for exchanging data between processes. These processes can either be on the same machine, or on different machines connected via a network. Once a socket connection is established, data can be sent in both directions until one of the endpoints closes the connection.
I needed to use sockets for a project I was working on, so I developed and refined a few C++ classes to encapsulate the raw socket API calls. Generally, the application requesting the data is called the client, and the application servicing the request is called the server. I created two primary classes, ClientSocket and ServerSocket, that the client and server could use to exchange data.
The goal of this article is to teach you how to use the ClientSocket and ServerSocket classes in your own applications. We will first briefly discuss client-server communications, and then we will develop a simple example server and client that utilize these two classes.

2. Overview of Client-Server Communications

Before we go jumping into code, we should briefly go over the set of steps in a typical client-server connection. The following table outlines these steps:
Server Client
1. Establish a listening socket and wait for connections from clients.
2. Create a client socket and attempt to connect to server.
3. Accept the client's connection attempt.
4. Send and receive data. 4. Send and receive data.
5. Close the connection. 5. Close the connection.
That's basically it. First, the server creates a listening socket, and waits for connection attempts from clients. The client creates a socket on its side, and attempts to connect with the server. The server then accepts the connection, and data exchange can begin. Once all data has been passed through the socket connection, either endpoint can close the connection.

3. Implementing a Simple Server and Client

Now its time to dig into the code. In the following section we will create both a client and a server that perform all of the steps outlined above in the overview. We will implement these operations in the order they typically happen - i.e. first we'll create the server portion that listens to the socket, next we'll create the client portion that connects to the server, and so on. All of the code in this section can be found in simple_server_main.cpp and simple_client_main.cpp.
If you would rather just examine and experiment with the source code yourself, jump to this section. It lists the files in the project, and discusses how to compile and test them.

3.1 Server - establishing a listening socket

The first thing we need to do is create a simple server that listens for incoming requests from clients. Here is the code required to establish a server socket:
listing 1 : creating a server socket ( part of simple_server_main.cpp )
#include "ServerSocket.h"
#include "SocketException.h"
#include 

int main ( int argc, int argv[] )
{
  try
    {
      // Create the server socket
      ServerSocket server ( 30000 );

      // rest of code -
      // accept connection, handle request, etc...

    }
  catch ( SocketException& e )
    {
      std::cout << "Exception was caught:" << e.description() << "\nExiting.\n";
    }

  return 0;
}


That's all there is to it. The constructor for the ServerSocket class calls the necessary socket APIs to set up the listener socket. It hides the details from you, so all you have to do is create an instance of this class to begin listening on a local port.
Notice the try/catch block. The ServerSocket and ClientSocket classes use the exception-handling feature of C++. If a class method fails for any reason, it throws an exception of type SocketException, which is defined in SocketException.h. Not handling this exception results in program termination, so it is best to handle it. You can get the text of the error by calling SocketException's description() method as shown above.

3.2 Client - connecting to the server

The second step in a typical client-server connection is the client's responsibility - to attempt to connect to the server. This code is similar to the server code you just saw:
listing 2 : creating a client socket ( part of simple_client_main.cpp )
#include "ClientSocket.h"
#include "SocketException.h"
#include 
#include 

int main ( int argc, int argv[] )
{
  try
    {
      // Create the client socket
      ClientSocket client_socket ( "localhost", 30000 );

      // rest of code -
      // send request, retrieve reply, etc...

    }
  catch ( SocketException& e )
    {
      std::cout << "Exception was caught:" << e.description() << "\n";
    }

  return 0;
}


By simply creating an instance of the ClientSocket class, you create a linux socket, and connect it to the host and port you pass to the constructor. Like the ServerSocket class, if the constructor fails for any reason, an exception is thrown.

3.3 Server - accepting the client's connection attempt

The next step of the client-server connection occurs within the server. It is the responsibility of the server to accept the client's connection attempt, which opens up a channel of communication between the two socket endpoints.
We have to add this functionality to our simple server. Here is the updated version:
listing 3 : accepting a client connection ( part of simple_server_main.cpp )
#include "ServerSocket.h"
#include "SocketException.h"
#include 

int main ( int argc, int argv[] )
{
  try
    {
      // Create the socket
      ServerSocket server ( 30000 );

      while ( true )
 {
   ServerSocket new_sock;
   server.accept ( new_sock );

   // rest of code -
   // read request, send reply, etc...

 }
    }
  catch ( SocketException& e )
    {
      std::cout << "Exception was caught:" << e.description() << "\nExiting.\n";
    }

  return 0;
}

Accepting a connection just requires a call to the accept method. This method accepts the connection attempt, and fills new_sock with the socket information about the connection. We'll see how new_sock is used in the next section.

3.4 Client and Server - sending and receiving data

Now that the server has accepted the client's connection request, it is time to send data back and forth over the socket connection.
An advanced feature of C++ is the ability to overload operators - or simply, to make an operator perform a certain operation. In the ClientSocket and ServerSocket classes I overloaded the << and >> operators, so that when used, they wrote data to and read data from the socket. Here is the updated version of the simple server:
listing 4 : a simple implementation of a server ( simple_server_main.cpp )
#include "ServerSocket.h"
#include "SocketException.h"
#include 

int main ( int argc, int argv[] )
{
  try
    {
      // Create the socket
      ServerSocket server ( 30000 );

      while ( true )
 {

   ServerSocket new_sock;
   server.accept ( new_sock );

   try
     {
       while ( true )
  {
    std::string data;
    new_sock >> data;
    new_sock << data;
  }
     }
   catch ( SocketException& ) {}

 }
    }
  catch ( SocketException& e )
    {
      std::cout << "Exception was caught:" << e.description() << "\nExiting.\n";
    }

  return 0;
}

The new_sock variable contains all of our socket information, so we use it to exchange data with the client. The line "new_sock >> data;" should be read as "read data from new_sock, and place that data in our string variable 'data'." Similarly, the next line sends the data in 'data' back through the socket to the client.
If you're paying attention, you'll notice that what we've created here is an echo server. Every piece of data that gets sent from the client to the server gets sent back to the client as is. We can write the client so that it sends a piece of data, and then prints out the server's response:
listing 5 : a simple implementation of a client ( simple_client_main.cpp )
#include "ClientSocket.h"
#include "SocketException.h"
#include 
#include 

int main ( int argc, int argv[] )
{
  try
    {

      ClientSocket client_socket ( "localhost", 30000 );

      std::string reply;
      try
 {
   client_socket << "Test message.";
   client_socket >> reply;
 }
      catch ( SocketException& ) {}

      std::cout << "We received this response from the server:\n\"" << reply << "\"\n";;

    }
  catch ( SocketException& e )
    {
      std::cout << "Exception was caught:" << e.description() << "\n";
    }

  return 0;
}
We send the string "Test Message." to the server, read the response from the server, and print out the response to std output.

4. Compiling and Testing Our Client And Server

Now that we've gone over the basic usage of the ClientSocket and ServerSocket classes, we can build the whole project and test it.

4.1 File list

The following files make up our example:
Miscellaneous:
Makefile - the Makefile for this project
Socket.h, Socket.cpp - the Socket class, which implements the raw socket API calls.
SocketException.h - the SocketException class
Server:
simple_server_main.cpp - main file
ServerSocket.h, ServerSocket.cpp - the ServerSocket class
Client:
simple_client_main.cpp - main file
ClientSocket.h, ClientSocket.cpp - the ClientSocket class

4.2 Compile and Test

Compiling is simple. First save all of the project files into one subdirectory, then type the following at your command prompt:
prompt$ cd directory_you_just_created
prompt$ make

This will compile all of the files in the project, and create the simple_server and simple_client output files. To test these two output files, run the server in one command prompt, and then run the client in another command prompt:
first prompt:
prompt$ ./simple_server
running....


second prompt:
prompt$ ./simple_client
We received this response from the server:
"Test message."
prompt$
The client will send data to the server, read the response, and print out the response to std output as shown above. You can run the client as many times as you want - the server will respond to each request.

5. Conclusion

Sockets are a simple and efficient way to send data between processes. In this article we've gone over socket communications, and developed an example server and client. You should now be able to add socket communications to your applications!


Rob Tougher

Rob is a C++ software engineer in the NYC area. When not coding on his favorite platform, you can find Rob strolling on the beach with his girlfriend, Nicole, and their dog, Halley.

Sockets Client - Server Model

Subsections

                                                                        LINK

IPC:Sockets

Sockets provide point-to-point, two-way communication between two processes. Sockets are very versatile and are a basic component of interprocess and intersystem communication. A socket is an endpoint of communication to which a name can be bound. It has a type and one or more associated processes.
Sockets exist in communication domains. A socket domain is an abstraction that provides an addressing structure and a set of protocols. Sockets connect only with sockets in the same domain. Twenty three socket domains are identified (see <sys/socket.h>), of which only the UNIX and Internet domains are normally used Solaris 2.x Sockets can be used to communicate between processes on a single system, like other forms of IPC.
The UNIX domain provides a socket address space on a single system. UNIX domain sockets are named with UNIX paths. Sockets can also be used to communicate between processes on different systems. The socket address space between connected systems is called the Internet domain.
Internet domain communication uses the TCP/IP internet protocol suite.
Socket types define the communication properties visible to the application. Processes communicate only between sockets of the same type. There are five types of socket.

A stream socket
-- provides two-way, sequenced, reliable, and unduplicated flow of data with no record boundaries. A stream operates much like a telephone conversation. The socket type is SOCK_STREAM, which, in the Internet domain, uses Transmission Control Protocol (TCP).
A datagram socket
-- supports a two-way flow of messages. A on a datagram socket may receive messages in a different order from the sequence in which the messages were sent. Record boundaries in the data are preserved. Datagram sockets operate much like passing letters back and forth in the mail. The socket type is SOCK_DGRAM, which, in the Internet domain, uses User Datagram Protocol (UDP).
A sequential packet socket
-- provides a two-way, sequenced, reliable, connection, for datagrams of a fixed maximum length. The socket type is SOCK_SEQPACKET. No protocol for this type has been implemented for any protocol family.
A raw socket
provides access to the underlying communication protocols.
These sockets are usually datagram oriented, but their exact characteristics depend on the interface provided by the protocol.

Socket Creation and Naming

int socket(int domain, int type, int protocol) is called to create a socket in the specified domain and of the specified type. If a protocol is not specified, the system defaults to a protocol that supports the specified socket type. The socket handle (a descriptor) is returned. A remote process has no way to identify a socket until an address is bound to it. Communicating processes connect through addresses. In the UNIX domain, a connection is usually composed of one or two path names. In the Internet domain, a connection is composed of local and remote addresses and local and remote ports. In most domains, connections must be unique.
int bind(int s, const struct sockaddr *name, int namelen) is called to bind a path or internet address to a socket. There are three different ways to call bind(), depending on the domain of the socket.

  • For UNIX domain sockets with paths containing 14, or fewer characters, you can:
    #include 
     ... 
    bind (sd, (struct sockaddr *) &addr, length);
    
  • If the path of a UNIX domain socket requires more characters, use:
    #include  
    ... 
    bind (sd, (struct sockaddr_un *) &addr, length); 
    
  • For Internet domain sockets, use
    #include 
    ... 
    bind (sd, (struct sockaddr_in *) &addr, length);
    
In the UNIX domain, binding a name creates a named socket in the file system. Use unlink() or rm () to remove the socket.

Connecting Stream Sockets

Connecting sockets is usually not symmetric. One process usually acts as a server and the other process is the client. The server binds its socket to a previously agreed path or address. It then blocks on the socket. For a SOCK_STREAM socket, the server calls int listen(int s, int backlog) , which specifies how many connection requests can be queued. A client initiates a connection to the server's socket by a call to int connect(int s, struct sockaddr *name, int namelen) . A UNIX domain call is like this:

struct sockaddr_un server; 
... 
connect (sd, (struct sockaddr_un *)&server, length);
while an Internet domain call would be:
struct sockaddr_in; 
... 
connect (sd, (struct sockaddr_in *)&server, length);
If the client's socket is unbound at the time of the connect call, the system automatically selects and binds a name to the socket. For a SOCK_STREAM socket, the server calls accept(3N) to complete the connection.
int accept(int s, struct sockaddr *addr, int *addrlen) returns a new socket descriptor which is valid only for the particular connection. A server can have multiple SOCK_STREAM connections active at one time.

Stream Data Transfer and Closing

Several functions to send and receive data from a SOCK_STREAM socket. These are write(), read(), int send(int s, const char *msg, int len, int flags), and int recv(int s, char *buf, int len, int flags). send() and recv() are very similar to read() and write(), but have some additional operational flags.
The flags parameter is formed from the bitwise OR of zero or more of the following:

MSG_OOB
-- Send "out-of-band" data on sockets that support this notion. The underlying protocol must also support "out-of-band" data. Only SOCK_STREAM sockets created in the AF_INET address family support out-of-band data.
MSG_DONTROUTE
-- The SO_DONTROUTE option is turned on for the duration of the operation. It is used only by diagnostic or routing pro- grams.
MSG_PEEK
-- "Peek" at the data present on the socket; the data is returned, but not consumed, so that a subsequent receive operation will see the same data.
A SOCK_STREAM socket is discarded by calling close().

Datagram sockets

A datagram socket does not require that a connection be established. Each message carries the destination address. If a particular local address is needed, a call to bind() must precede any data transfer. Data is sent through calls to sendto() or sendmsg(). The sendto() call is like a send() call with the destination address also specified. To receive datagram socket messages, call recvfrom() or recvmsg(). While recv() requires one buffer for the arriving data, recvfrom() requires two buffers, one for the incoming message and another to receive the source address.
Datagram sockets can also use connect() to connect the socket to a specified destination socket. When this is done, send() and recv() are used to send and receive data.
accept() and listen() are not used with datagram sockets.

Socket Options

Sockets have a number of options that can be fetched with getsockopt() and set with setsockopt(). These functions can be used at the native socket level (level = SOL_SOCKET), in which case the socket option name must be specified. To manipulate options at any other level the protocol number of the desired protocol controlling the option of interest must be specified (see getprotoent() in getprotobyname()).

Example Socket Programs:socket_server.c,socket_client

These two programs show how you can establish a socket connection using the above functions.

socket_server.c

#include 
#include 
#include 
#include 

#define NSTRS       3           /* no. of strings  */
#define ADDRESS     "mysocket"  /* addr to connect */

/*
 * Strings we send to the client.
 */
char *strs[NSTRS] = {
    "This is the first string from the server.\n",
    "This is the second string from the server.\n",
    "This is the third string from the server.\n"
};

main()
{
    char c;
    FILE *fp;
    int fromlen;
    register int i, s, ns, len;
    struct sockaddr_un saun, fsaun;

    /*
     * Get a socket to work with.  This socket will
     * be in the UNIX domain, and will be a
     * stream socket.
     */
    if ((s = socket(AF_UNIX, SOCK_STREAM, 0)) < 0) {
        perror("server: socket");
        exit(1);
    }

    /*
     * Create the address we will be binding to.
     */
    saun.sun_family = AF_UNIX;
    strcpy(saun.sun_path, ADDRESS);

    /*
     * Try to bind the address to the socket.  We
     * unlink the name first so that the bind won't
     * fail.
     *
     * The third argument indicates the "length" of
     * the structure, not just the length of the
     * socket name.
     */
    unlink(ADDRESS);
    len = sizeof(saun.sun_family) + strlen(saun.sun_path);

    if (bind(s, &saun, len) < 0) {
        perror("server: bind");
        exit(1);
    }

    /*
     * Listen on the socket.
     */
    if (listen(s, 5) < 0) {
        perror("server: listen");
        exit(1);
    }

    /*
     * Accept connections.  When we accept one, ns
     * will be connected to the client.  fsaun will
     * contain the address of the client.
     */
    if ((ns = accept(s, &fsaun, &fromlen)) < 0) {
        perror("server: accept");
        exit(1);
    }

    /*
     * We'll use stdio for reading the socket.
     */
    fp = fdopen(ns, "r");

    /*
     * First we send some strings to the client.
     */
    for (i = 0; i < NSTRS; i++)
        send(ns, strs[i], strlen(strs[i]), 0);

    /*
     * Then we read some strings from the client and
     * print them out.
     */
    for (i = 0; i < NSTRS; i++) {
        while ((c = fgetc(fp)) != EOF) {
            putchar(c);

            if (c == '\n')
                break;
        }
    }

    /*
     * We can simply use close() to terminate the
     * connection, since we're done with both sides.
     */
    close(s);

    exit(0);
}

socket_client.c


#include 
#include 
#include 
#include 

#define NSTRS       3           /* no. of strings  */
#define ADDRESS     "mysocket"  /* addr to connect */

/*
 * Strings we send to the server.
 */
char *strs[NSTRS] = {
    "This is the first string from the client.\n",
    "This is the second string from the client.\n",
    "This is the third string from the client.\n"
};

main()
{
    char c;
    FILE *fp;
    register int i, s, len;
    struct sockaddr_un saun;

    /*
     * Get a socket to work with.  This socket will
     * be in the UNIX domain, and will be a
     * stream socket.
     */
    if ((s = socket(AF_UNIX, SOCK_STREAM, 0)) < 0) {
        perror("client: socket");
        exit(1);
    }

    /*
     * Create the address we will be connecting to.
     */
    saun.sun_family = AF_UNIX;
    strcpy(saun.sun_path, ADDRESS);

    /*
     * Try to connect to the address.  For this to
     * succeed, the server must already have bound
     * this address, and must have issued a listen()
     * request.
     *
     * The third argument indicates the "length" of
     * the structure, not just the length of the
     * socket name.
     */
    len = sizeof(saun.sun_family) + strlen(saun.sun_path);

    if (connect(s, &saun, len) < 0) {
        perror("client: connect");
        exit(1);
    }

    /*
     * We'll use stdio for reading
     * the socket.
     */
    fp = fdopen(s, "r");

    /*
     * First we read some strings from the server
     * and print them out.
     */
    for (i = 0; i < NSTRS; i++) {
        while ((c = fgetc(fp)) != EOF) {
            putchar(c);

            if (c == '\n')
                break;
        }
    }

    /*
     * Now we send some strings to the server.
     */
    for (i = 0; i < NSTRS; i++)
        send(s, strs[i], strlen(strs[i]), 0);

    /*
     * We can simply use close() to terminate the
     * connection, since we're done with both sides.
     */
    close(s);

    exit(0);
}

Exercises

Exercise 12776
Configure the above socket_server.c and socket_client.c programs for you system and compile and run them. You will need to set up socket ADDRESS definition.


Dave Marshall
1/5/1999

Programming in C UNIX System Calls and Subroutines using C


 Programming in C
UNIX System Calls and Subroutines using C.


Search for Keywords in C Notes


Keyword Searcher


Download Postscript Version of Notes


Click Here to Download Course Notes. Local Students Only.


Algorithm Animations


Direct link to Java Algorithm Animations (C related)


C COURSEWARE

Lecture notes + integrated exercises, solutions and marking


Online Marking of C Programs --- CEILIDH